Get ready to create a festive glow in your outdoor space with DIY outdoor Christmas tree lights.
In this article, we’ll show you how to choose the perfect space, gather materials, and prepare your trees and bushes.
With precision and a few extra touches, you’ll create stunning DIY Christmas tree shapes that will light up your holiday season.
Don’t forget to learn how to maintain and store your outdoor lights for future use.
Let’s get started!
Choosing the Perfect Outdoor Space
Choose a location that suits your outdoor Christmas tree lighting needs. When selecting the perfect spot for your festive display, consider factors such as visibility, power source availability, and weather conditions.
Ensure that your chosen location provides maximum visibility from both inside and outside your home. This way, you and your guests can enjoy the twinkling lights from every angle.
Additionally, make sure there’s a nearby power source to easily connect your lights. This will save you from the hassle of using long extension cords or worrying about battery life.
Lastly, take into account the weather conditions in your area. If you live in a region with heavy snowfall or strong winds, choose a location that offers some protection to prevent damage to your Christmas tree lights.
Gathering the Materials You’ll Need
When gathering the materials you’ll need for your DIY outdoor Christmas tree lights, make sure to consider the specific requirements discussed in the previous subtopic.
Start by gathering the essentials: string lights, extension cords, and a power source. Opt for LED string lights as they’re energy-efficient and last longer.
Measure the height and width of your outdoor tree to determine the length of string lights required. Additionally, consider the color and style of lights that will complement your outdoor space.
Don’t forget to check the weather resistance rating of the lights to ensure they can withstand outdoor conditions.
Lastly, gather any additional decorations or accessories you may want to incorporate, such as ornaments, ribbons, or tree toppers.
Preparing Your Trees and Bushes
To properly prepare your trees and bushes for the DIY outdoor Christmas tree lights, regularly trim and maintain them throughout the year.
Keeping your trees and bushes well-maintained won’t only enhance their overall appearance but also create a better canvas for your festive lights.
Start by removing any dead or diseased branches to promote healthy growth and prevent potential hazards.
Additionally, shaping the trees and bushes will ensure a more uniform and aesthetically pleasing display of lights. Regular pruning can also help control the size and shape of your plants, making it easier to arrange the lights in a way that highlights their natural form.
Remember to trim them just before installing the lights to ensure a fresh and tidy look that will last throughout the holiday season.
Stringing Lights With Precision
Start by carefully measuring the length of lights needed for each tree and bush. This step is crucial to ensure that you have enough lights and that they’ll be evenly distributed. To measure accurately, start at the base of the tree or bush and follow its contours all the way up to the top. Take note of any branches or obstacles that may require additional lights.
Once you have determined the length needed, it’s time to start stringing the lights. Begin at the bottom and work your way up, wrapping the lights around the branches in a neat and organized manner. Make sure to secure the lights firmly, using twist ties or clips, to prevent them from slipping or sagging.
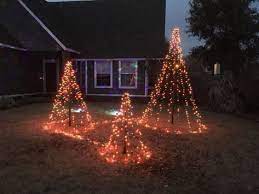
Creating DIY Christmas Tree Shapes
Get creative and shape your own DIY Christmas trees with outdoor lights.
Creating unique and festive Christmas tree shapes is a fun and imaginative way to decorate your outdoor space during the holiday season.
Start by choosing a location for your DIY Christmas tree and gather your materials. You can use various types of outdoor lights such as string lights or net lights to bring your tree to life.
Begin by outlining the shape of your tree using lights, starting from the bottom and working your way up. Be sure to secure the lights in place using hooks or clips.
Once your tree shape is complete, step back and admire your handiwork. Your DIY Christmas tree will add a magical touch to your outdoor decorations and spread holiday cheer to all who see it.
Adding Extra Festive Touches
Now that you have shaped your DIY Christmas tree with outdoor lights, it’s time to add some extra festive touches to make it truly magical.
One way to do this is by incorporating ornaments into your tree. Hang colorful baubles, sparkling garlands, and shimmering ribbons from the branches. These ornaments will catch the light from the outdoor lights and create a dazzling effect.
Another idea is to add a tree topper. Choose a star, angel, or other decorative piece that reflects your personal style. Place it at the very top of the tree to complete the look.
Lastly, consider adding some outdoor decorations around the base of the tree. This could include potted plants, lanterns, or even a small wreath. These extra touches will enhance the overall festive atmosphere and make your DIY Christmas tree shine even brighter.
Maintaining and Storing Your Outdoor Lights
To ensure the longevity of your outdoor lights, regularly inspect and clean them using a soft cloth and mild detergent. This will help remove any dirt or debris that may accumulate over time. After cleaning, make sure to thoroughly dry the lights before reconnecting them. This will prevent any potential damage from moisture.
Additionally, it’s important to store your outdoor lights properly when not in use. One way to do this is by wrapping them around a piece of cardboard or a storage reel. This will help prevent tangling and make it easier to unravel them next year.
Finally, store your lights in a cool and dry place to avoid any potential damage from extreme temperatures or humidity.
Frequently Asked Questions
How Do I Calculate the Amount of Lights I Will Need for My Outdoor Christmas Trees?
To calculate the amount of lights you’ll need for your outdoor Christmas trees, measure the height and width of each tree. As a general guide, use 100 lights per foot. Multiply the height by 100 for an estimate.
Can I Use LED Lights for My Outdoor Christmas Tree Decorations?
Yes, you can use LED lights for your outdoor Christmas tree decorations. They are energy-efficient, durable, and come in various colors. LED lights also emit less heat, making them safer to use.
What Is the Best Way to Secure the Lights on My Trees and Bushes to Prevent Them From Falling Off?
To prevent your lights from falling off your trees and bushes, the best way to secure them is by using zip ties or twist ties. These will hold the lights in place and ensure a festive, glowing display.
Are There Any Safety Precautions I Should Take When Installing Outdoor Christmas Tree Lights?
When installing outdoor Christmas tree lights, make sure to follow safety precautions. Check that the lights are rated for outdoor use, use insulated hooks or clips to secure them, and avoid overloading electrical outlets to prevent accidents.
How Can I Make My Outdoor Christmas Tree Lights Last Longer and Stay in Good Condition Throughout the Holiday Season?
To make your outdoor Christmas tree lights last longer and stay in good condition throughout the holiday season, be sure to unplug them when not in use, protect them from harsh weather, and store them properly after the season ends.
Conclusion
In conclusion, DIY outdoor Christmas tree lights can transform your outdoor space into a festive wonderland.
By carefully choosing the perfect outdoor space, gathering the necessary materials, and stringing the lights with precision, you can create beautiful DIY Christmas tree shapes.
Adding extra festive touches and properly maintaining and storing your lights will ensure they shine brightly for years to come.
Enjoy the magical glow of your DIY outdoor Christmas tree lights this holiday season!